SolSAXS Tab
This tab is used with the automated dispenser for solution experiments. There are two main panels: the left one (1 and 6) is mostly for operations of the dispenser (currently a Hamilton dispenser) and the right one (2-5) is for sample setups. The left can be operated without the input from the right.
In the dispenser command panel (1), the user can select commands for the device to perform. There are also other commands the user can select from the command list, such as move the motors that are associated with the solution delivery system, and open or close shutters, etc. The user can execute one command at a time by clicking on the "Go" button that is on the same line as the command. Or the user can execute all the commands, from top to bottom, sequentially, in the panel (1) by clicking on the "Run All" button in the action panel (6).
In the action panel (6), the user can save current commands into the database by clicking on one of the "Save1" to "Save6" buttons. The user can also recall previously saved commands by clicking on one of the "Get1" to "Get6" buttons. "Get1" will recall commands saved by clicking on the "Save1" button, and "Get2" will recall commands saved by clicking on the "Save2" button, and so on. There is a "SavClean" button for saving the commands to the database for later recall by the "GetClean" button. The user can also save the commands to a file using the "SaveFile" button, and populate the commands from a file using the "GetFile" button.
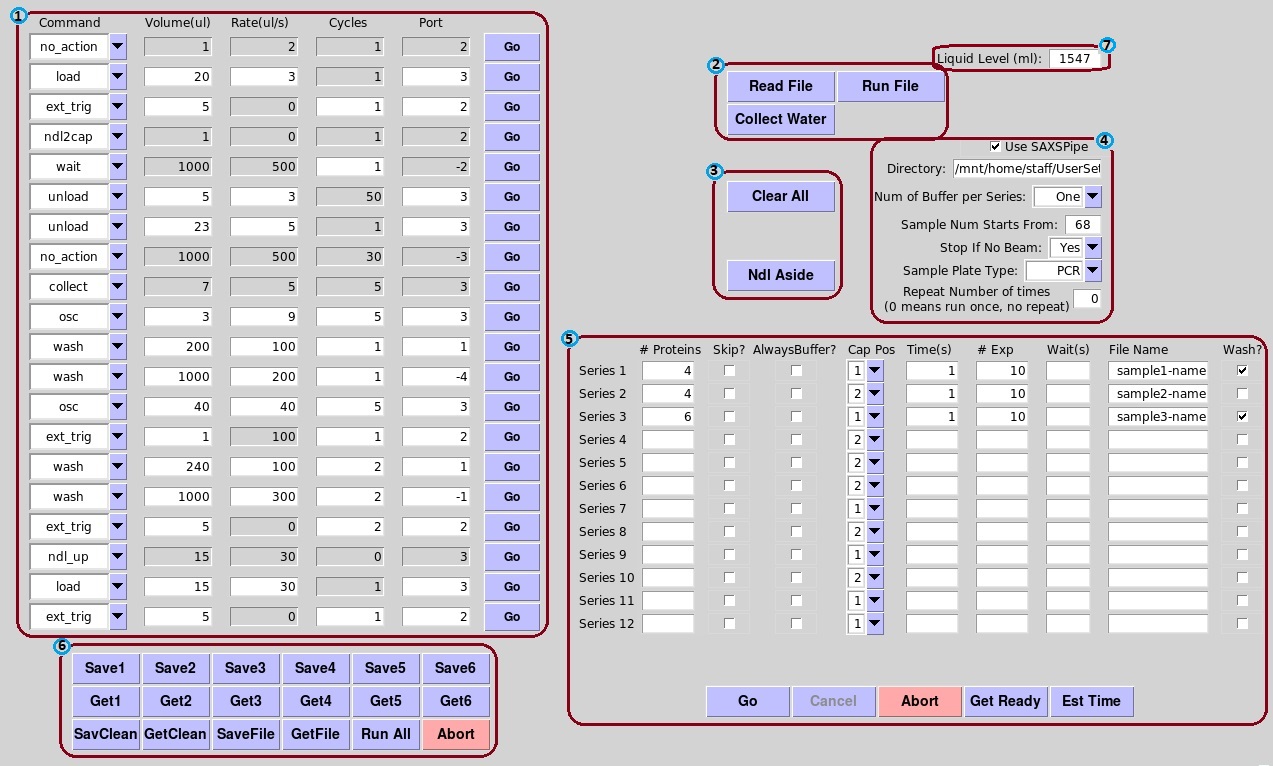
The user can also read commands from a file by clicking on the "Read File" button (2), and then run the commands in that file by clicking on the "Run File" button. The user is advised to consult with the beamline support staff as to how to use this capability. A pre-defined routine to collect water scattering can be run by clicking the "Collect Water" button (2).
The user can clear all the fields in the command panel (1) and the sample parameter panel (5) by clicking on the "Clear All" button (3). Clicking on the "Ndl Aside" button (3) will cause the needle of the sample delivery system to the home position, where it is safe while the user is exchanging solution samples on the sample stage.
In panel (4), the user can specify general experimental parameters, such as whether to use SAXSPipe, directory the image files will be saved, number the file name will start with, and whether to continue exposure in case the x-ray beam is lost, for all the samples. The user can also specify how many buffer samples are there in one series. If "None", all the samples are treated as protein samples; if "One", the series has one buffer at the beginning; if "Multi", the series has the alternate buffer-protein-buffer-protein sample arrangement. Furthermore, the user can specify what sample plate type, either PCR or 96Well, is being used.
Parameters for individual solution samples are set in the sample parameter panel (5). Each series represents a row in the sample plate, and each row has one buffer solution placed at the no 1 slot and up to 7 protein samples after the buffer. The user can specify whether to skip the series ("Skip?") and whether to acquire images from the buffer solution for each protein ("Always Buffer?"), and set the time for each exposure ("Time(s)"), how many exposures per solution ("# Exp"), how long to wait between exposures ("Wait(s)", and file name root ("File Name"). The user can also tell BluIce whether to run an extra cleaning cycle at the end of the series ("Wash?"). The series end cleaning will use the commands saved by clicking "SavClean" in the action panel (6).
The sample plate has 12 rows, and therefore the user can set 12 series at one time. The user can get a time estimate for all the series to finish by clicking on the "Est Time" button. The estimated time will be given in the message panel below (the message panel is not shown in the above picture).
The user can check if everything is set up correctly by clicking on "Get Ready" button. All the commands on the dispenser command panel (1) will be run sequentially from top to bottom. This could also be used to perform a cleaning procedure before the data acquisition.
The user needs to pay attention to the dispenser reservoir liquid level (7). If the level is getting down close to 500 ml, please alert the beamline scientist.
Once everything is set, the user click on the "Go" button in the sample parameter panel (5), and Blu-Ice will start data acquisiton.
Video tutorial for SolSAXS tab is available.