Aircraft turbine engines routinely experience the ingestion of debris resulting in "foreign object damage" or FOD. Failures associated with foreign object damage have been estimated to cost the aerospace industry $4 billion per year. Often, FOD does not lead to sudden catastrophic failure, yet such damage can dramatically reduce the lifetime of components subjected to cyclic fatigue stresses. Turbine blades, for example, are susceptible to debris strikes and also experience significant fatigue loading. The current study seeks to develop insight into the driving forces and predictability of fatigue failures induced by foreign object damage. Such insight can be used to improve existing design methodologies for turbine engine components and inspection regimens.

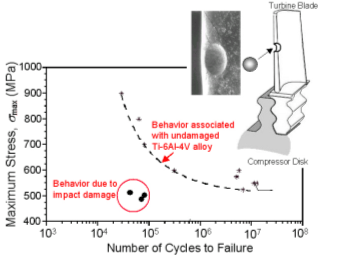
The material used for this study, a titanium alloy Ti-6Al-4V, is commonly used for blades in the front, low-temperature stages of the engine, where the initial foreign object strikes can occur. Details of the material, heat treatment, and microstructure can be found in Ref. [1]. The lifetime of undamaged Ti-6Al-4V is illustrated by the dashed line in Fig. 1. This curve shows typical behavior for metallic materials: as the fatigue stresses are increased, the number of cycles to failure is decreased. The fatigue limit, defined as the stress level at which no failures would occur within 107 cycles, is smax ~525 MPa for the undamaged material. When components are subjected to stresses below this level, the component can be thought of as having an essentially infinite life. However, at a maximum cyclic stress of only 500 MPa, below the nominal fatigue limit, impact-damaged Ti-6Al-4V has a lifetime of <105 cycles as shown by the circles in Fig. 1. This dramatic reduction in fatigue life can lead to premature and unexpected failure of components in service, resulting in costly repairs or in the worst case, loss of life. The role of foreign object damage in reducing fatigue life is thought to be due to five factors: (1) the residual stresses imparted on the component due to the impact, (2) the stress-concentration associated with the shape of the impact site, (3) incipient microcracks formed during impact, (4) plastic work in the material, or (5) distortion of the microstructure. To establish the relative importance of each of these factors, it is necessary to experimentally quantify their contributions under representative conditions. Synchrotron mesodiffraction provides a unique tool for quantifying the residual stresses and estimating the plastic work in the material. The other factors (stress concentration, microcracking, and microstructural distortion) have been quantified by direct optical or SEM observation.
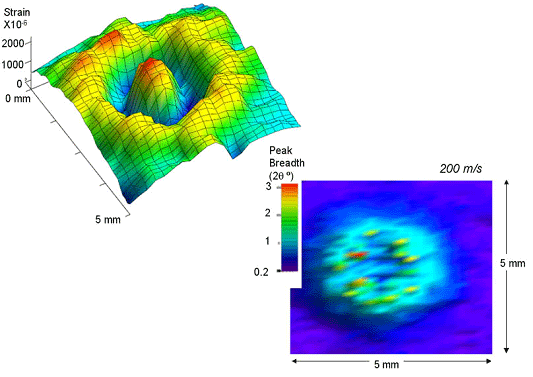
For this study, FOD was simulated by firing 3.2 mm dia. hardened steel spheres at flat surfaces of Ti-6Al-4V at velocities of 200-300 m/s using a compressed gas gun. Details of sample preparation and the gas gun impact method can be found in Ref. [2]. For comparison, indents, with dimensions nominally identical to the dynamic indents, were also made quasi-statically by applying load on a sphere with a servohydraulic testing machine. Residual elastic strains were measured directly using x-ray diffraction. The change in surface-normal lattice spacing from an unstressed condition, measured as a shift in the Bragg peak positions, allowed quantification of the surface-normal strain. At the surface, where the x-ray measurement is made, the observed surface-normal strain is the Poisson response to in-plane stresses. An incident beam size of ~300 mm was defined using incident slits on SSRL beamline 2-1 and the diffracted x-rays were filtered through Soller slits to avoid errors associated with a divergent beam geometry. A 3-axis screw stage mounted to the goniometer directly beneath the sample allowed the incident beam to be rastered about the indents, thereby creating a spatially-resolved map of surface-normal strain. An example of such a strain map is shown in Fig. 2 for an impact site formed at 200 m/s. The surface-normal strain at the center of the impact crater is strongly positive, which is indicative of a compressive in-plane stress under the assumption of equibaxiality. At all other locations about the indent, in-plane stresses are not equibiaxial, and therefore direct conversion from surface-normal strain to in-plane stress is not possible. Nevertheless, strain maps such as shown in Fig. 2 are useful to identify variability in the sample as well as compare to finite element modeling predictions of the residual elastic strains. While a shift in the Bragg peak positions was related to lattice strains, a broadening of the Bragg peak is related to plastic lattice distortion. Other researchers (e.g. Ref. [3]) have shown that there is an empirical, material-dependent relationship between the Bragg peak breadth (or full width at half maximum), and the degree of plastic strain in the material. The peak breadth map is shown in Fig. 2, resulting from the same measurements that were used to extract surface-normal strain. The Bragg peaks in undeformed regions had a breadth of ~0.2º, whereas the Bragg peaks in the deformed impact crater ranged up to 3º, corresponding to plastic strains in excess of 20%.

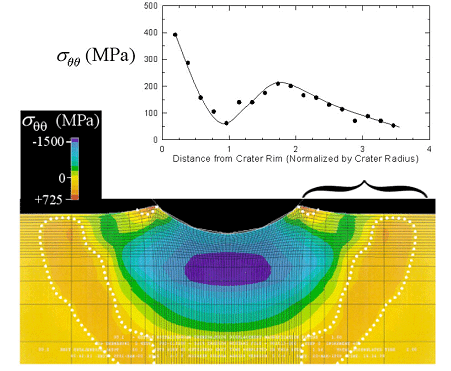
While residual elastic strains and Bragg peak widths can provide insight, the most useful quantity for interpreting the mechanics of failure is the residual stress. Measurement of residual stresses using x-ray diffraction is possible using the well-established sin2y technique. In this technique, the diffraction vector is tilted to various angles, y, with respect to the surface normal to establish a linear relationship between the d-spacing and sin2y. The slope of the linear relationship is directly proportional to the in-plane residual stress in the plane of tilt and the scaling factor, or x-ray elastic constant, is determined empirically using an in situ load frame. Details of the sin2y method and its limitations can be found elsewhere (e.g. Ref. [4]). Here again, the spatial resolution provided by a small incident spot size allowed the in-plane residual stresses to be mapped. Because the technique is quite time intensive, full two-dimensional maps of the residual stress components were not practical. Instead, linear variations of residual stress, emanating radially away from the crater rim, were readily evaluated. For example, Fig. 3 is such a plot showing the residual hoop stress, sqq, as it varies away from the rim of a quasistatically-formed indent crater until it eventually decays to zero at a distance of ~4 crater radii away from the crater rim. The linear plot of stress variation, measured at the surface of the sample (x-ray extinction depths are on the order of ~20 mm for 8.048 keV x-rays in Ti), can be compared directly to the residual stress state predicted by the finite element method (FEM). As shown in Fig. 3, FEM predicts a high tensile stress immediately at the crater rim, followed by a quick decay to near zero stresses, and then a secondary broad tensile zone about 1-2 radii away from the crater, consistent with the x-ray observations. Quantitative details of this comparison can be found in Ref. [5].

In similar experiments conducted on dynamically-induced impact craters, a few apparent contradictions were identified. At an impact velocity of 300 m/s, FEM predicted that the residual hoop stresses at the crater rim would be the most intense tensile stresses at a value of ~+300 MPa. Such a value appeared to be consistent with observed reductions in stress-life fatigue behavior: by linear superposition, an applied maximum stress of 500 MPa multiplied by a stress concentration factor of 1.25 plus a 300 MPa residual stress leads to a total stress acting in the direction of loading of 925 MPa, consistent with the observed lifetimes in the vicinity of 50,000 cycles. However, the actual measured residual hoop stress value, using the sin2y technique was not 300 MPa as predicted but rather 0 MPa. This discrepancy between FEM and the x-ray stress measurements was better understood when SEM inspection of the impact craters, revealed impact-induced microcracks at the rim of the craters after impact. These microcracks serve two purposes: (1) to relieve the elastic strain energy that would have been responsible for the presence of residual stresses, and (2) to provide a preferred site for crack initiation and accelerated failure under subsequent fatigue loading conditions. Analysis of these cracks within a fracture mechanics framework indicated that they indeed were responsible for failure, and that the residual stress contribution should indeed be negligible.

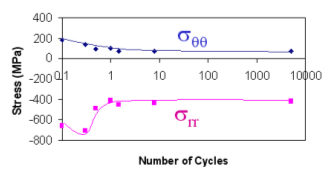
Another apparent contradiction was identified in impact craters formed at 200 m/s. At this velocity, fatigue-cracks were almost always found to form at the center of the impact crater, not at the rim. Yet both the FEM predictions and the observed x-ray measurements of the as-impacted stress state at the crater floor indicated a strong compressive stress of -500 MPa. The presence of such a strong compressive stress is thought to mitigate rather than promote crack formation and failure. In fact, based on the FEM and x-ray analysis, the cracks would have been expected to form at the crater rim, where the residual hoop stresses were +150 MPa (no microcracking was present at this lower impact velocity). In this case, an in situ fatigue load frame resolved this apparent contradiction. By applying load cycles to the impacted specimen, the residual stress state was shown to dramatically change during fatigue. The residual stress state was in fact found to "relax" during the first fatigue cycle, an effect later attributed to Bauschinger reversed yielding. An example of the residual stress relaxation effect is shown in Fig. 4 for the hoop and radial stress components at the crater rim. When fatigued at a maximum stress of 500 MPa, the compressive stresses at the crater floor and the tensile stresses at the crater rim, were found to decay by more than a factor of two. While this relaxation phenomenon alone still leaves the crater rim as the preferred site for failure, the 30% higher stress concentration factor present at the center of the crater overwhelms the now faded compressive residual stress state. A much more thorough description of the relaxation observations can be found in Ref. [6].
In summary, mesodiffraction experiments conducted with an x-ray spot small enough for adequate spatial resolution, but large enough to sample a sufficiently large number of grains for powder diffraction experiments, have provided unique insight into the magnitude and spatial distribution of residual stresses, their corresponding residual elastic strains, and the levels of plastic deformation caused by high-velocity and quasi-static impact events. This insight has been incorporated into a fracture mechanics based framework for prevention of FOD-driven failures. The details of this fracture mechanics approach can be found in Ref. [7].
This research was carried out at the Stanford Synchrotron Radiation Laboratory, a national user facility operated by Stanford University on behalf of the U.S. Department of Energy, Office of Basic Energy Sciences. Sandia is a multiprogram laboratory operated by Sandia Corporation, a Lockheed Martin Company, for the United States Department of Energy's National Nuclear Security Administration under contract DE-AC04-94AL85000.
- B. L. Boyce and R. O. Ritchie, "Effect of load ratio and maximum stress intensity on the fatigue threshold in Ti-6Al-4V", Engineering Fracture Mechanics, 68(2), pp. 129-147, 2001.
- J. O. Peters, O. Roder, B. L. Boyce, A. W. Thompson, and R. O. Ritchie, "Role of foreign object damage on thresholds for high-cycle fatigue in Ti-6Al-4V", Metallurgical and Materials Transactions A, 31A(6), pp. 1571-1583, 2000.
- P. S. Prevéy, "Current Applications of X-ray Diffraction Residual Stress Measurement," in Developments in Materials Characterization Technologies, eds. G.F. Vander Voort and J. J. Friel, American Society of Metals, Materials Park, OH, pp. 103-110.
- I. C. Noyan and J. B. Cohen, "Residual Stress: Measurement by Diffraction and Interpretation," Springer-Verlag, New York, 1987.
- B. L. Boyce, X. Chen, J. W. Hutchinson, and R. O. Ritchie, "The residual stress state due to a spherical hard-body impact", Mechanics of Materials, 33(8), pp. 441-454, 2001.
- B. L. Boyce, X. Chen, J. O. Peters, J. W. Hutchinson, and R. O. Ritchie, "Mechanical relaxation of localized residual stresses associated with foreign object damage", Materials Science and Engineering A, 349(1-2), pp. 48-58, 2003.
- J. O. Peters, B. L. Boyce, X. Chen, J. M. McNaney, J. W. Hutchinson and R. O. Ritchie, "On the application of the Kitagawa-Takahashi Diagram to foreign object damage and high-cycle fatigue", Engineering Fracture Mechanics, 69(13), pp. 1425-1446, 2002.
B. L Boyce, X. Chen, J. O Peters, J. W Hutchinson and R. O Ritchie, "Mechanical Relaxation of Localized Residual Stresses Associated with Foreign Object Damage", Mater. Sci. Eng. A 349, 48 (2003)

